Testing and prototyping in Kube
To build a reliable product it is essential that we build ways for us to ensure that what we build also works as expected.
In its simplest form that means that you try what you build, the assumption being that if it works for you, it works for everyone.
- By now we all know that “works for me” is not enough, but there are also a variety of additional challenges;
- It’s not enough to only test when a feature is first implemented, the tests need to be repeated regularly to ensure nothing breaks that once worked.
- There is a balance to be struck between over- and under- testing. Tests need to be of high quality and have to be maintained with the system, otherwise they become a burden instead of an asset.
- The right things need to be tested. Test things that are too trivial and you end up with loads of tests with little value (but a maintenance cost). Test things that are too complex and your tests become fragile and don’t tell you what broke, making fixing it harder.
- The testenvironment needs to be realistic enough so we test the right things (e.g. we don’t want to test the internet connection typically), yet also removes the bits that we don’t have under our control, so we test our system only. That ensure that the test remain reliable and are fast to run (so they are run regularly).
Automated testing
A first step is naturally to do unit testing. By testing small units we can ensure that those units work as expected and continue to work that way. For unit tests we deliberately try to isolate the unit to test, to make the setup as simple as possible. That ensures that we only test that specific unit and not some dependencies. After all we only want to make sure that this specific unit does what it’s supposed to do, and want to avoid the test breaking if something changes somewhere else in the system.
Theoretically we could make sure this way, that every unit works as expected and theoretically the combination thereof should thus work as well. In practice that doesn’t really work though and the interaction between units becomes essential to test as well. This is known as integration testing.
With integration testing we try to test the combination of units. Because these setups are much more complex than just an individual unit we can’t hope to test all possible states, but rather focus on expected behaviours and failure cases.
While we always need a combination of the various testing approaches, there isn’t really a “correct” way to test, and ideas on how good testing looks differ a lot.
Automated tests are code
One aspect that is important to keep in mind is that test are part of the applications code-base, and thus need to be held to the same standard.
Tests need to be maintained and evolved with the rest of the code-base, and it’s therefore just as important to keep tests clean and succinct, as it is for the rest of the code-base. A poor test-suite will eventually bite back just like a poor code-base does.
Finding the right balance
A balance needs to be struck for the right amount of testing and the right type of tests. Having for instance multiple test that test the same assumption, makes changing that assumption costly, because suddenly all your tests start failing. Instead it would be much better only one test started failing, so either the test or the code can be fixed, depending on wether the change was intentional or not. Having to adjust too many tests shouldn’t hold back development of the code-base, otherwise there is probably something wrong with either the architecture or the tests.
For Kube we don’t have any rigorous policies for what needs to be tested how, but in general we probably favor integration tests over unit tests, and keep the tests to the necessary minimum. With unit tests there is a risk of ending up doing a lot of work with little value because you end up writing a lot of test code for codepaths that have little risk of breaking. Because we try to break code dependencies for unit tests we all end up testing the unit in an artificial environment, which may not expose the problems we face in the real setup.
Integration tests allow us to ensure the units work as a whole and we exercise the real-world code paths as they work together in practice.
Of course unit testing complicated pieces of logic is still useful, both for development and to quickly establish that a defect in an integration test does not stem from the unit covered by the additional test.
UI Testing
Something that has greatly improved with the use of QML is that we can now relatively simply test the actual UI code as in production. This is especially important as QML is not a compiled language, and we thus have no compiler to protect us from typos or similar simple mistakes. For QML, a test that simply instantiates the UI can thus already reveal a whole set of errors.
Going further we want to manipulate the UI though, and then verify that what we expect to happen actually happens. For this we have built integration tests that instantiate the UI, interact with it, and then assert the expected outcome. These integration tests operate on the usual infrastructure, not just some dummy, which enables us to verify that individual usecases indeed work in a realistic scenario.
The framework built for this i.e. allows us to:
- Populate sink with a resource for mail transport and one for storage.
- Add a an email draft.
- Load that draft in the composer and trigger the send button.
- Finally verify that the message has indeed ended up in the mailtransport resource, and that the draft has been removed.
This triggers all the same code-paths that we’d also get when manually clicking through the application, so the only thing that isn’t covered is the network interaction.
    function test_sendMessage() {
        var initialState = {
            accounts: [{
                    id: "account1",
                }],
            identities: [{
                    account: "account1",
                    name: "Test Identity",
                    address: "identity@example.org"
                }],
            resources: [{
                    id: "resource1",
                    account: "account1",
                    type: "dummy"
                },
                {
                    id: "resource2",
                    account: "account1",
                    type: "mailtransport"
                }],
                mails:[{
                    resource: "resource1",
                    subject: "subject",
                    body: "body",
                    to: ["to@example.org"],
                    cc: ["cc@example.org"],
                    bcc: ["bcc@example.org"],
                    draft: true
                }]
        }
        TestStore.setup(initialState)
        var composer = createTemporaryObject(composerComponent, testCase, {})

        var createdMail = TestStore.load("mail", {resource: "resource1"})

        var loadAsDraft = true
        composer.loadMessage(createdMail, loadAsDraft)
        var sendMailButton = findChild(composer, "sendButton")
        verify(sendMailButton)
        tryVerify(function(){ return sendMailButton.enabled })
        sendMailButton.clicked()

        tryVerify(function(){ return TestStore.load("mail", {resource: "resource2"}) })
        tryVerify(function(){ return !TestStore.load("mail", {resource: "resource1"}) })

        var outgoingMail = TestStore.read(TestStore.load("mail", {resource: "resource2"}))
        compare(outgoingMail.subject, "subject")
        compare(outgoingMail.draft, false)
    }
The test code including setup.
Prototyping
As a nice side-effect of the new test infrastructure we can also use it for UI prototyping.
Just like we setup a sink environment for individual tests, we can use the same infrastructure to set-up a test environment to work on the UI.
Each “view” (the composer, the conversation view, the addressbook, ….), comes with a main.qml file that can be launched using qmlscene. All the main.qml file has to do is set-up the test-environment and then instantiate the relevant view. The dataset to work with can thus be easily customized to stress corner cases (e.g. a long subject line in the conversation view), and remains the same for all developers.
Of course being able to launch only a small self-contained part of the application also helps feedback round-trip times during development, as you e.g. don’t have to always launch the full application, unlock it and then navigate to the right view, before you can check whether a change had the intended effect.
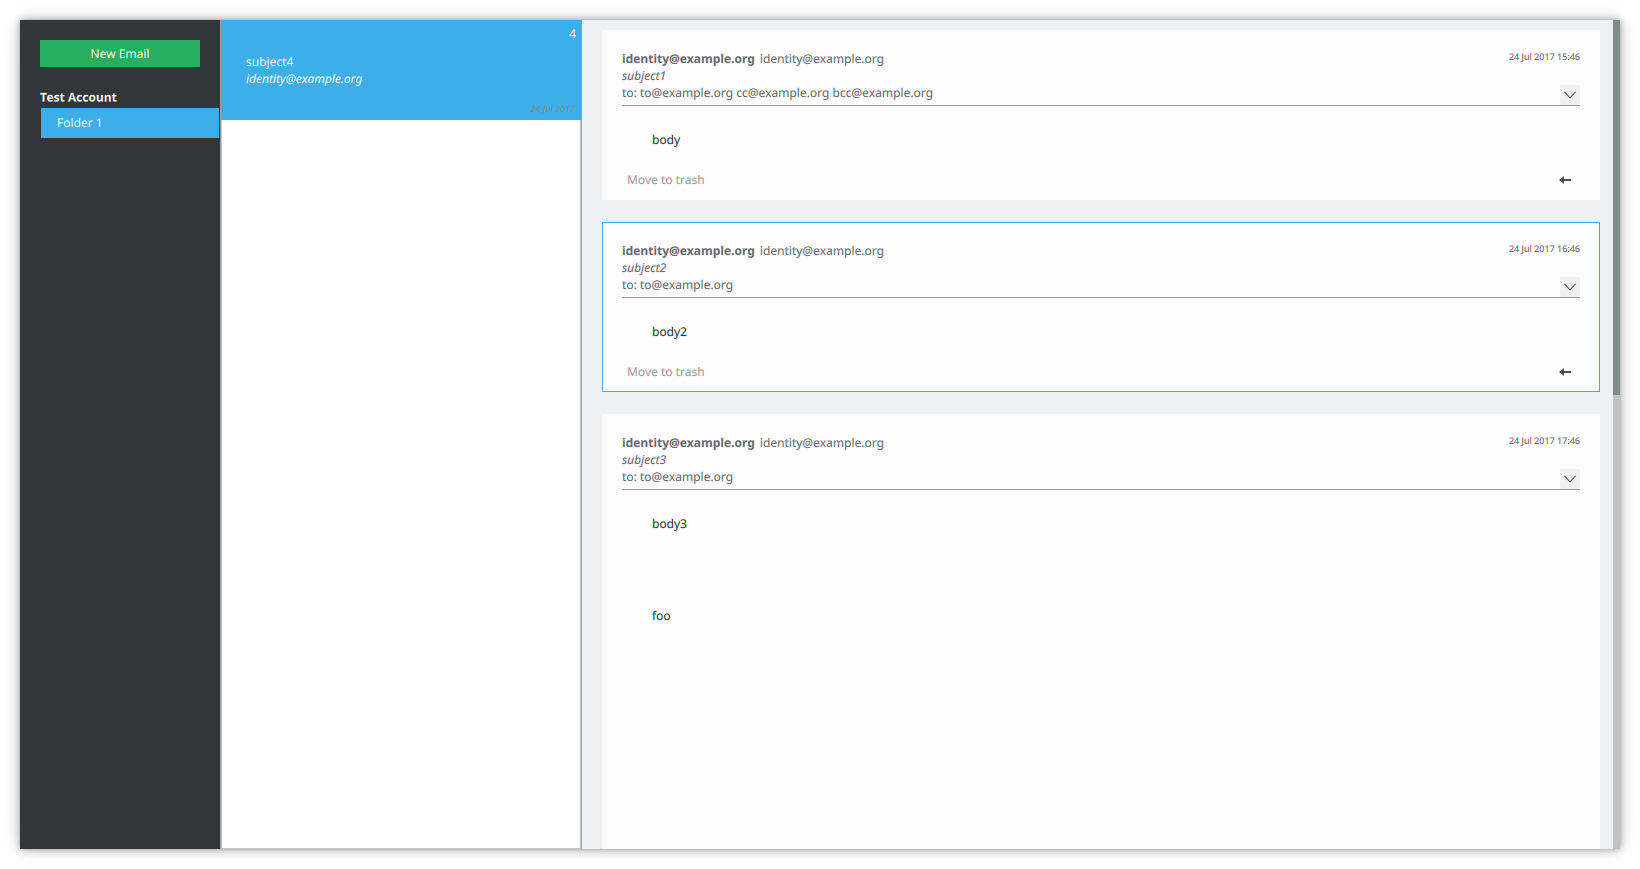
The conversation view spawned via qmlscene.
ApplicationWindow {
    Component.onCompleted: {
        var initialState = {
            accounts: [{
                    id: "account1",
                    name: "Test Account"
                }],
            identities: [{
                    account: "account1",
                    name: "Test Identity",
                    address: "identity@example.org"
                }],
            resources: [{
                    id: "resource1",
                    account: "account1",
                    type: "dummy"
                },
                {
                    id: "resource2",
                    account: "account1",
                    type: "mailtransport"
                }],
            folders: [{
                    id: "folder1",
                    resource: "resource1",
                    name: "Folder 1",
                    mails: [{
                            resource: "resource1",
                            messageId: "<msg1@test.com>",
                            date: "2017-07-24T15:46:29",
                            subject: "subject1",
                            body: "body",
                            to: ["to@example.org"],
                            cc: ["cc@example.org"],
                            bcc: ["bcc@example.org"],
                        },
                        {
                            resource: "resource1",
                            inReplyTo: "<msg1@test.com>",
                            date: "2017-07-24T16:46:29",
                            subject: "subject2",
                            body: "body2",
                            to: ["to@example.org"],
                        }
                    ]
                }],
        }
        TestStore.setup(initialState)
    }

    View {
        anchors.fill: parent
    }
}
The code to setup the conversation view in its main.qml.
Going forward
While this is a good start, I think there is much more that could be done:
- We could inspect all QML objects and inspect them for problems such as improper anchoring (which is not always visible without resizing).
- Multiple data-sets could be provided to stress different aspects of the UI.
- The qmlscene test-setup could be enhanced with live-reloading as the code is edited.
- Tests could be executed in already packaged and deployed versions, to further increase certainty that everything works as expected (The best test-suite doesn’t help if we end up installing the qml files in the wrong place in the end).
In any case, I think we’re on a good path with a test infrastructure that is both powerful and maintainable =)
For more info about Kube, please head over to About Kube.